-
 The Beginner’s Journey: How a PR Manager Started Affiliate Marketing. Part 4. Settings27.2.2023Reading Time: 13 minutes
Hi there again!
Since my recent post, I’ve had a few affiliate discoveries that I’ll be sharing in notes-posts. Yeah, like a curious young naturalist, I wasn’t just curious about setting up my campaign but was also careful to notice important and useful things.
Now tell me, did you read “naturalist” as “NUTRALIST”? 😏 Alright, I’ll come with a confession first – that’s how I mistakenly spelled the word the first time, until I noticed its odd look. Yes, as it often happens, I got affiliate fever even before the campaign was launched, and I started to see many things a little differently. The new experience affected me faster than I thought it would. I described it in more detail here & here.
Usually, the “fever” becomes more intense and turns into an affiliate disease after a while. For example, when you mentally place a porn shot or a photo of a slim girl in your creative, or estimate any amount of money in equivalent sales got on an offer.

But when you wake up at night thinking that you have forgotten to set a daily spend limit or to check a risky campaign, you sweat and shudder a little, then it’s an affiliate disease. So far I can’t say whether it mainly happens to newbies or to more experienced affiliates as well. Here is my experience: I looked through statistics and found +2 sales, and my account’s balance was higher. Felt happy. I thought “oh, they’re previous holds, great!”. But after a couple of moments, I realized that it was a dream. Got upset. I guess it’s still a fever yet 😄– Wait, sales, holds…you haven’t even started yet!
Not really. Once you start affiliate marketing, the niche pulls you in like a vortex. I was able to build a campaign and I started it even quicker than I thought, I could barely take notes! And now when I have taken a break, it’s time to begin talking about my daring AdVenture (even though it’s not over).
Well, last time I decided upon the offer, traffic source, and landing page.
But it got * spoiler * a little more interesting (and a little more difficult) after that. Today I’ll share the important part of the launch for newbies – the technical part (I call it so). Do not panic, there won’t be any digging in the HTML code, and we won’t cover the API either – only the basics.
A movie starts with a script, while an affiliate dramatic thriller (I consider affiliate marketing to belong to this genre) starts with a
hand tremorsetting up a tracking tool, postback, buying a domain, and finding a server…. Basically, with everything that will ensure you’re in control of your campaign. And with what will give you peace of mind that the leads won’t make a “wrong turn” on the way to the affiliate network and change your affiliate movie genre to horror.I’ll begin with the main thing. With tracking. This is the software that collects and processes data on the advertising campaign for further analysis and optimization. I’ll explain more about it later.
Getting a tracking tool
– Is this necessary?
Highly recommended. This is an important analytical tool that helps you optimize your campaign, conclude on A/B test results, and conveniently monitor multiple campaigns/offers, creatives, and sources within one application.
The tracker has a lot of different settings to tailor it to your needs. It has good traffic-splitting functionality and detailed reports. I was also happy about its low price. I’ve heard about it a lot. I also know that many of our partners were using it. So I had thought about it at first, but decided to analyze the market anyway. Finally, I opted for it. They say if one works with gray offers and small volumes, then Keitaro would be an excellent choice.
– How to choose a tracking software?
With your heart and slightly with your mind 😉 And surely by looking into your wallet. All trackers are alike and perform similar tasks. When choosing, you can either focus on the prices and the availability of certain types of reports, or some kind of special functionality for your vertical, such as clo@king. Most tracking software offers a free trial period, so you can make sure that it is convenient and suitable to use. Something like that. Oh, wait a second, though. There is one more thing to consider – the type of the tracking tool.
Keitaro is a self-hosted tracking software, it’s installed on the user’s server. This means that the user (me and you) must buy server space / a server to host the tracking software. Yep, I went the hard way. I like adventures.
Let’s go into more detail.

There are self-hosted tracking software or server-based trackers installed on your private/purchased server, and there is a cloud tracking software that stores data on cloud servers. This type doesn’t require any extra actions from the user. The server can be leased from the tracking software company. The tracking software application is already running on a server – everything is handled for you.
You buy only a software application with the server-based tracking software, whereas you buy the software application + a server with a cloud tracker.
Server-based trackers allow only the user to access the data. Employees of the tracking software company don’t have any data access. Thus, the user has to monitor the server and optimize it, if necessary.
For cloud trackers, the company’s team maintains the server. The user’s data can then be accessed by employees in this way.
As for security, I should mention that by choosing a virtual server for the server-based tracker, we are approaching a cloud solution, which means that we aren’t alone in having access to the data. Well, come on, who cares about valuable information (besides affiliates themselves) about the number of conversions coming from the creative that depicts something other than Pinocchio’s nose, something that got enlarged without lying.
So the data security issue can be crossed out, but how to figure out what type of tracking software is the best choice?
Cloud trackers can process a huge amount of information and expand resources (for an extra charge) at any time, quickly and easily. Cloud hosting is distributed across multiple servers in different locations around the globe, so that the country of the offer doesn’t really matter, as from any point the data will be processed rapidly. And, if a server fails, it will quickly redirect the request to a working one. Data backup is provided. But usually, cloud tracking software is more expensive than server-based trackers. If you have a large volume of traffic / many GEOs to test (which is common among beginners), and you don’t want to economize, then opt for cloud-tracking software.
Server-based tracking software requires additional time to learn the installation process and to complete the installation on the server, which you need to choose and pay for additionally. Increasing capacity involves changing the plan, which will take some time. The server must be located closer to the country of the offer to ensure fast data processing. If the server fails, you’ll need to wait for its recovery, so that the landing page / site’ll be back to its operational state. In case an affiliate works with one GEO and needs to save money, the server-based tracking software will be a good solution.

It seems like cloud tracker is better, but I won’t say so. One can select the best variant based on one’s goals and preferences.– How does the tracking software work, by the way?
The tracker, or more accurately, its virtual server, is an intermediate element between the source of traffic and the affiliate network:
🤝(affiliate network) – 🤖 (tracker) – 💲 (traffic source)To start promoting an offer, you need to copy the affiliate link in the affiliate network and then add it to the tracker, where it’ll get a new appearance. The URL of the server where the tracking software application is hosted will be implemented into it. The new link is placed in a traffic source:
🤝(tracking link from affiliate network) —> 🤖 (tracker) —> 🤝(tracking link from affiliate network) + 🤖🌐 (URL of the server with tracker) —> 💲 (traffic source)After clicking on the link, the user passes through the server with the tracker, which records data according to the macros (parameters), and is redirected to the URL of the affiliate link (where the landing page is located).
👥 (users) —> 🤖🌐 (URL of the server with tracker) —> 🤝(tracking link from affiliate network)
The engine of the tracker is the postback URL, which “ties in” the tracker with an affiliate network and a traffic source. With this link, the tracker displays conversions from the traffic source, as well as their statuses from the affiliate network.
Let’s go into more detail. Postback is a HTTPS request (my case) to a server via postback URL, which is entered in the settings of the tracking software.
The Postback URL within the tracker includes parameters (macros) for recording and sending data from the traffic source to the tracker and from the tracker to the affiliate network. And back respectively. Thus, we set up two postbacks (trsffic source + tracker and tracker + affiliate network). All the statistics that we see in the tracking software and the network, is formed from the information received through the parameters of postback request.
The key parameter of the postback URL is Click ID. It’s made up of random letters and numbers generated by the traffic source. This is a record of the user (click) that visits the landing page. Click ID is sent from the traffic source to the affiliate network via the tracker. If the user is converted, the conversion will be assigned to this Click ID. Then, it’ll come back via postback request from the network to the tracker with an updated status – sale, hold or trash (we’ll talk about this later). The conversion will also appear in the traffic source.
🤝(affiliate network) <—> 🚀(postback URL1 ) + 🤖 (tracker) + 🚀(postback URL 2) <—> 💲 (traffic source)
I’ll tell you about setting up this wonderful link later.
Meanwhile, I signed up for Keitaro and got a trial period.
Choosing a server
First, you find out what requirements the tracker has for the server. Keitaro has the following requirements:
OS: CentOS 8 or 9 Stream
KVM (Kernel-based Virtual Machine) – software for virtualization on Linux
Minimal available memory: 2GB RAM.
Keitaro simplifies the job for its clients. In the tracker, you can select the necessary settings that will be used to match the desired server provider. However, there are only a few of them, and none of them attracted me. I’ll buy a server in DigitalOcean. It was recommended to me, and after checking the price and characteristics of its servers, I deemed it suitable.
So, the basic rule of buying a server – to buy it as close as possible to the country in which the offer will be promoted.
My country is Argentina. Let’s go.
I’m not going to buy a physical server. I need a virtual server/virtual machine (VPS – virtual private server) – this is a small part of one physical server that operates like the PC, being a software computer. The physical server can have many virtual servers (machines). RAM and other resources of one physical server are allotted between all the machines.
🖥
⬇
💻💻💻💻
My tracking software application will be hosted on one of such leased virtual servers.
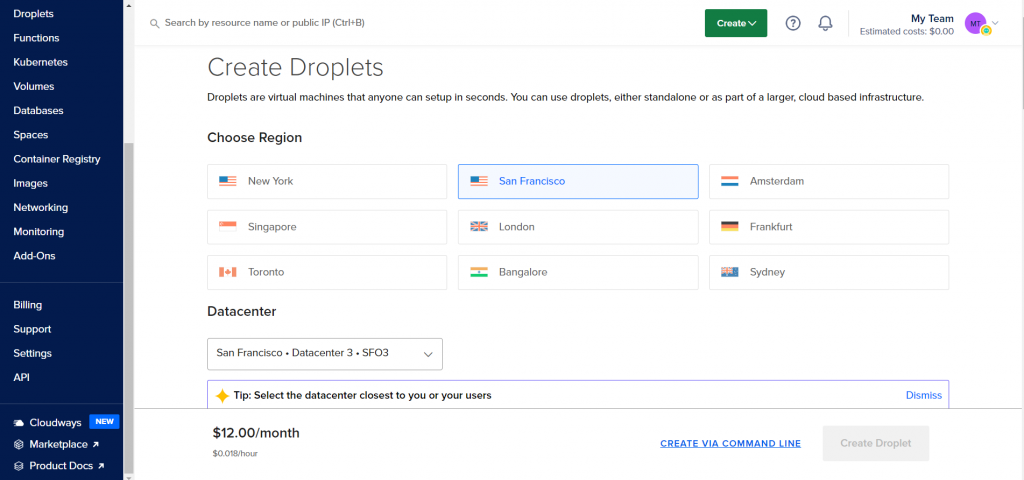
I bought a server in San Francisco, near Argentina.I got ready for further setup, but… after searching for Keitaro in the Marketplace, I found its preset settings. That’s what I’m going to choose.

I pick the minimal RAM and resources, it’s enough for a beginner.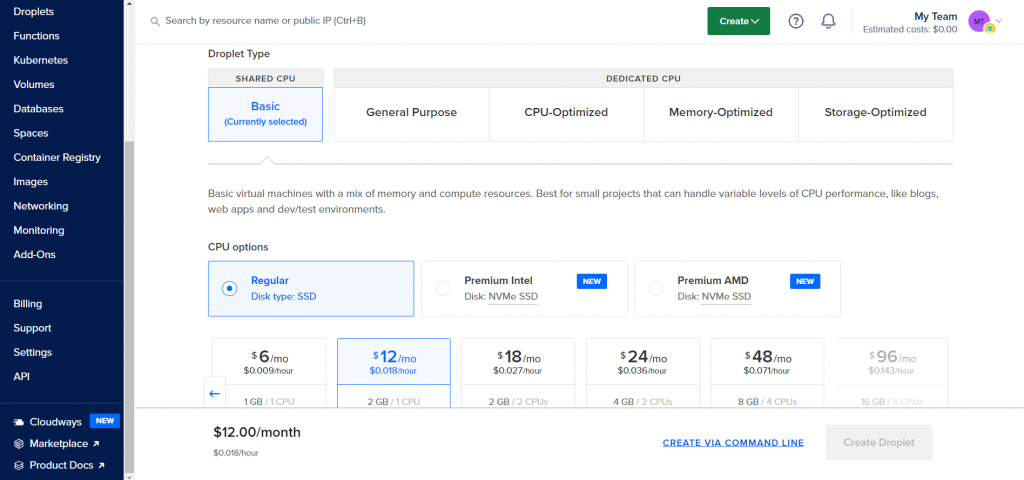
Next, it is advisable to create SSH (Secure Shell) – a key for a secure connection to the server. This is a special code that allows the remote computer to identify the user.

A secure connection is better than an unsecured one. Well, then let’s get the key.
Actually, it is a pair of keys – a private key and a public one. The private one is kept by the user and the public one is recorded in the authorized_keys file of the server.Here (Windows) and here (MacOS / Linux) you can find detailed instructions on how to generate them.
The private key needs to be saved to my computer in a secret place, but not the way students usually hide their adult videos. Easily. The file requires an additional password for secure access to the private key at the local computer level.
I don’t need the extras, so I click on the button to create a virtual machine. Here is my first purchase, $12.
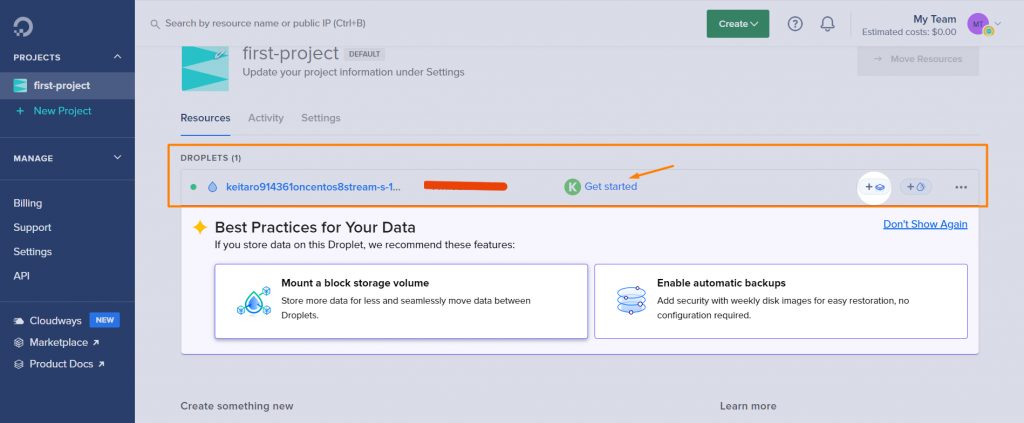
Voila, the virtual server with the tracker installed is ready, and the IP is available! I happily click the Start button.
I logged into the tracker. That’s not the end of the line yet. I entered the tracker via *IP*/admin, an unsecured HTTP connection. The reason is that I have a server, without a name – a domain name. So, the next steps are to make the connection to the server secure (HTTPS) – 1) buy and point the domain to an IP address of the server; 2) get an SSL certificate for the domain name.
I’ll give you details below.
Choosing a domain name
Domain name is a text key, the address that will provide access (direct) to the server with the tracking software application / website. The domain name for the server with the tracker must be used only for purposes of tracking.
The primary reasons to buy a domain name:
- Secure https connection is enabled. In this way, the site (to which the domain name leads) will no longer seem suspicious and unreliable. Affiliate links will be generated with a mention of the domain name for the tracker. Operating via https means a reduced risk of blocking by users’ browsers and traffic loss;
- The possibility to drive traffic to a good-looking address (link) without a tracker identifier. For instance, if you work with your own landing page or host one of the affiliate networks (downloaded from the network and published to your server under your domain name). P.S.: I won’t do so. The first reason seems motivational to me.
Choose any domain name registrar and buy the cheapest variant available. You can do it for $2. That’s what I did. Another purchase for me.Btw, if you are advised to buy an SSL certificate right on the website of the domain name registrar, hold on your click on the “Buy” button. If the domain will be used for a tracking software application (as in my case), the tracker will issue the certificate for free (!) after connecting the server to the domain.
Pointing domain name to a server
I go to the site where I bought the domain. I need the DNS tab. DNS (Domain Name System) is a domain name system. It is a database of domain names and IPs. One of its functions is to link domain names to the IP addresses of servers. For more info about DNS, you can check out an interesting article by my colleague. I highly recommend that you read it if you are interested in learning more about the domain name hierarchy, choosing a hosting company, and creating a reliable domain name.
Domain registration companies usually have free DNS servers. I’ll pick them. Now I need to include the IP address of my server in A record of DNS server (host records). I add @ to the subdomain field (reminds you of e-mail?) and then put the IP address in the other field.
I go to the tracker and click on the last tab at the top “Domains”,And enter the domain name I bought:
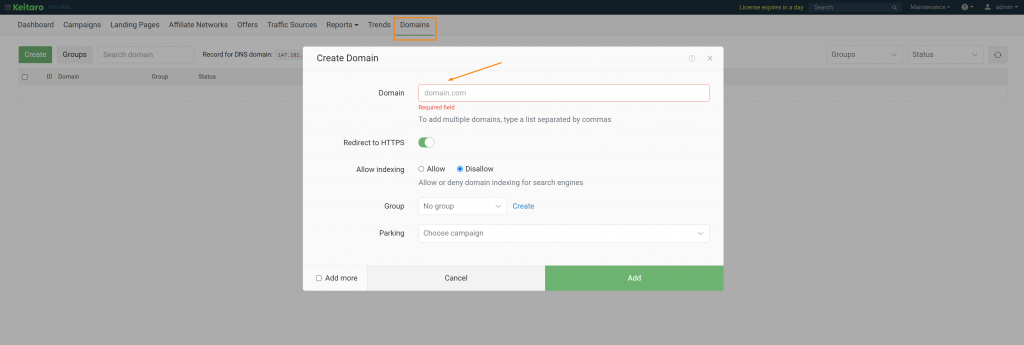
Almost done, but we aren’t at the end point yet.

I need to wait (affiliates have much patience) until the DNS servers are updated, which can take up to 24 hours. But 10-20 minutes are always enough. And they were enough for me.

Got it! The domain name has been bound to the server where the tracker is hosted. The SSL certificate is now created, along with the HTTPS protocol. So, the connection with the server is secure.
By the way, the tracker can now be accessed through the domain name: *domain name*/admin.
Postback setup
I reached the important stage. I told you about the postback at the beginning of this post.
Thanks to the postback URL, I (and all the affiliates around the world) can receive statuses from the affiliate network, as well as information on clicks and leads from the traffic source. That info facilitates understanding the audience, its preferences, and ways to optimize the campaign.
I’ll share with you the instructions on setting up the postback URL.
It won’t take more than 5 minutes to set it up, time me.
Keitaro has a ready-made template for AdCombo, simply select the network on the list of templates in the Affiliate Networks tab:

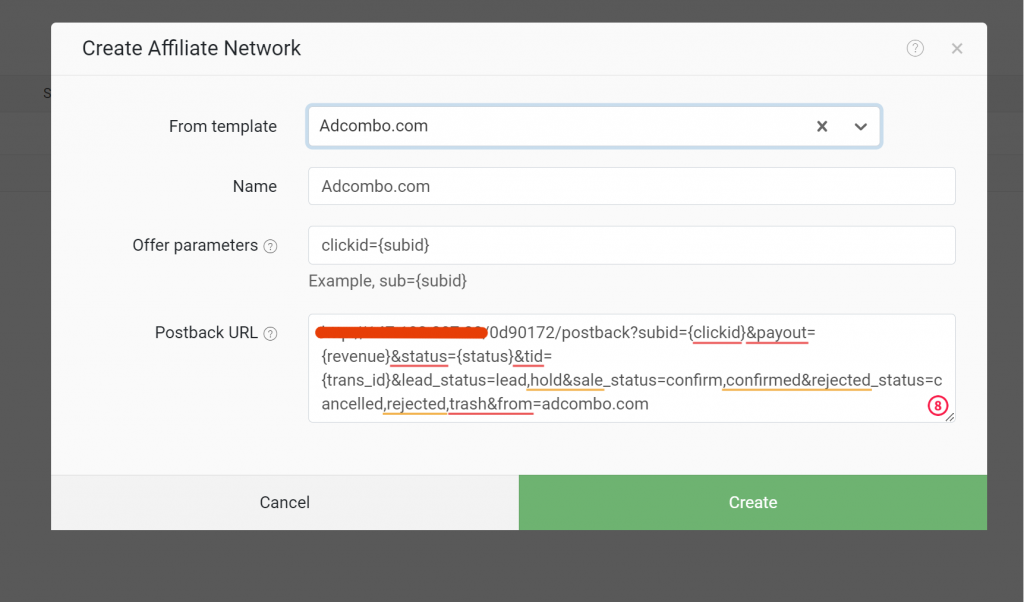
Here’s the link! Now I go to the Postbacks tab of my AdCombo account.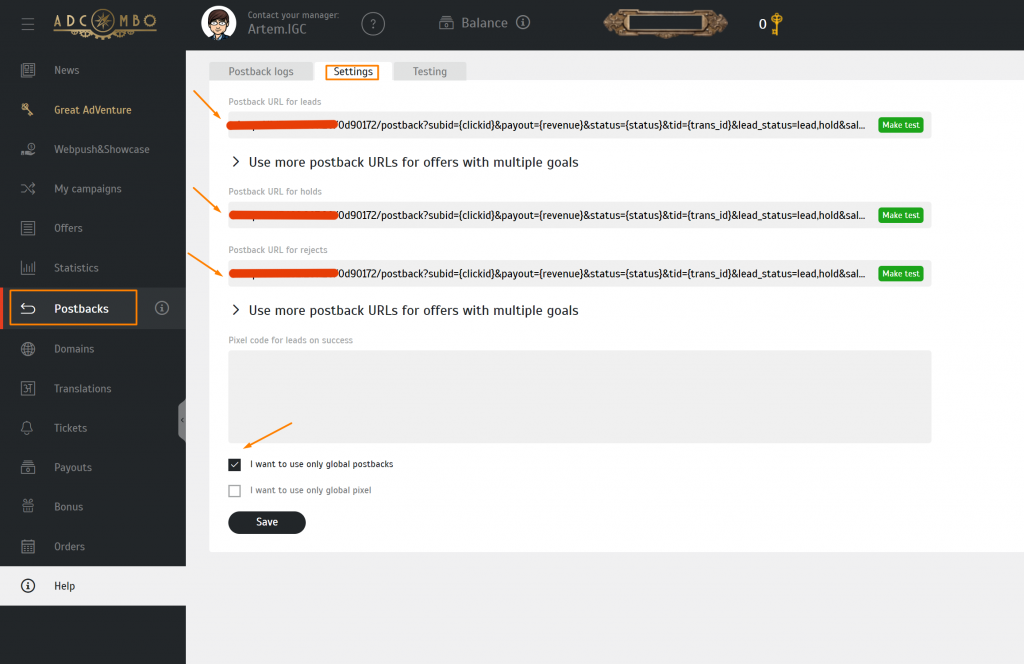
I paste the link in three fields to monitor the status of leads, holds, and order cancellations (rejects).
Leads are users who filled out an order form and left the phone number for the call center agents.
Holds are the same as above, but later the leads did not pick up the phone and confirm the order.
Canceled orders (rejects) – leads who canceled the order over the phone.
The last two definitions haven’t caused a tingle anywhere? 😄
Then tick the checkbox to use these postback settings for all campaigns in the future (most likely I won’t need to generate a different postback link for the offer).
I save it.
A little later, when I create a campaign, it’ll be necessary to check whether the postback link transmits data from the affiliate network to the tracking software application, in other words, to check whether the link works properly.
In the meantime, I’ll write down the cost of Keitaro’s monthly plan – $27.08.
Total costs:
- Virtual server for a month – $12
2. Domain name – $2
3. Tracking software for a month – $27.08
Total: $41.08

Yet the biggest expenses lie ahead. When I’ll be buying ads in a traffic source. That’s classic.
My notes for the tech stage are nearing the end. I go on writing with one hand while waving the other at the screen. Soon, I’ll tell you about my selection of creatives, campaign creation, and its launch on the push ads of RichAds. As always, you’ll be supplied with useful deets.Wish you an easy campaign launch and a lotta payouts!
- Secure https connection is enabled. In this way, the site (to which the domain name leads) will no longer seem suspicious and unreliable. Affiliate links will be generated with a mention of the domain name for the tracker. Operating via https means a reduced risk of blocking by users’ browsers and traffic loss;


Hi, I am aminul. I am a digital Marketer and Cpa Marketer.I have many
Traffic such as Facebook, Twitter,pintarest,Instagram etc. I have 4
Month Experience in Affiliate Marketing.
Hi there! Nice to e-meet you. Wish you good luck with your affiliate way! (:cool-1:)
Do you work with paid traffic? if yes how much is needed for the minimum campaign budget?
NICE
Thanks! (:happy-6:) It’s going to get more interesting, just like the way of a newbie in affiliate marketing!
Hi I am sujon. I am a CPA markater. I have some traffic such as Facebook Twitter instagream etc.
Hi there! May your campaigns’ ROIs be high in these sources (:happy-2:)
Which network you work?
Hi, I am MD ZAKIR. I am a Cpa Marketer. And Digital Marketer I have maney
Traffic such as Facebook, Twitter,pintarest,Instagram etc. I have 4
Month Experience in Affiliate Marketing. (:greed:)